How To Tunnel Connections Through SSH
Contents
Background
The ECE firewall secures the ECE network from hostile Internet traffic. SSH tunneling is one way to work around some of the limitations imposed by the firewall. (Another method to tunnel through the firewall is to use pool-based VPN.)
Although SSH is commonly used as a terminal to obtain a remote shell prompt, it can also be used for web browsing and running X applications.
Instructions for Unix / Linux / Mac OS X Clients
Linux, Mac OS X, and most Unix workstations come with OpenSSH already installed. You can specify which ports to tunnel using the -D, -L, -X, and -Y options. For example:
ssh -D1080 -L1706:service:1706 -L1711:service:1711 -X ssh.ece.ubc.ca
- -D1080 Sets up a SOCKS proxy on port 1080, which is useful for web browsing. (If you then configure your web browser to use a SOCKS proxy on localhost, port 1080, then your web browsing requests will appear to originate from ssh.ece.ubc.ca instead of from your machine.)
- -L1706:service:1706 Forwards a local TCP port. With this forwarding in place, you can connect to service.ece.ubc.ca:1706 by connecting to port 1706 of your workstation instead.
- -X Forwards X11 connections. With X11 forwarding, you could for example run xclock on ssh.ece.ubc.ca in the SSH session and have the application displayed on your workstation.
Instructions for Windows Clients
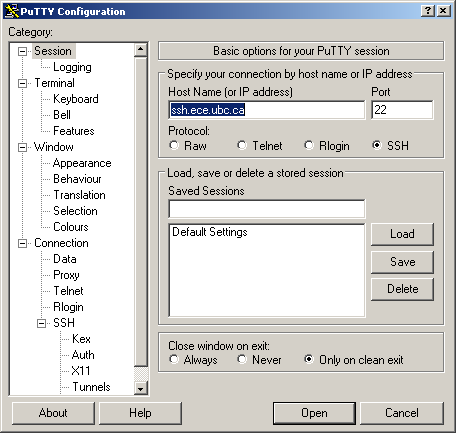
First, install and launch PuTTY (see How To Use SSH).
At the first screen, enter the host to connect to (the host that your connections will tunnel through).
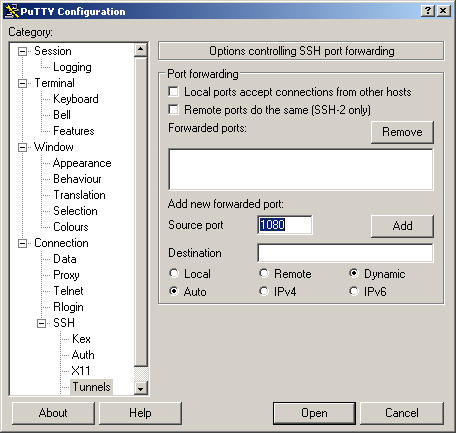
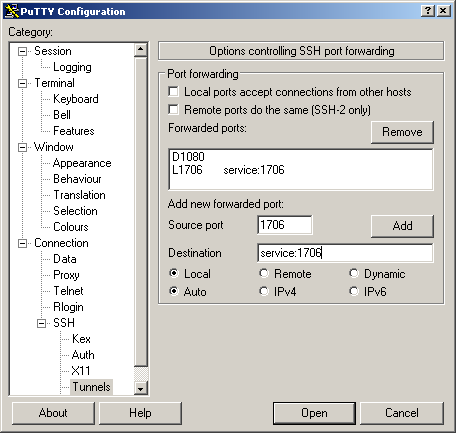
The tunnels are configured on the Connection > SSH > Tunnels pane.
To set up a SOCKS proxy on port 1080, enter 1080 as the Source port, select Dynamic, then click Add. (If you then configure your web browser to use a SOCKS proxy on localhost, port 1080, then your web browsing requests will appear to originate from ssh.ece.ubc.ca instead of from your machine.)
To set up a tunnel such that connections to port 1706 on your machine end up as connections to port 1706 on service.ece.ubc.ca, enter 1706 as the Source port, service.ece.ubc.ca:1706 as the Destination, select Local, then click Add.
X11 tunnels may be configured through the Connection > SSH > X11 pane.
When you are done configuring the tunnels, click Open to start the SSH session and activate the tunnels. Before you do so, you may wish to go back to the Session pane to save the configuration.


